How to click a button using Selenium
What is Selenium?
Selenium is a popular open-source tool for automating browsers, and most commonly used by developers to automate testing for their web applications. Developers and test engineers write Selenium scripts to automatically navigate to a URL, fill in forms, click on buttons in order to validate that their web application behaves according to their expectation.
In this article, we’ll explain how to click a button using Selenium with code examples.
How to click on a button using Selenium
To click on a button using Selenium, first find the element that you want to click, and then use the click() command to perform a single click using the left mouse button.
Here's an example of how to click a button by Element ID using Java, Python, and Javascript:
// click on button with the id "login-btn"
WebElement button = driver.findElement(By.id("login-btn"));
button.click();# click on button with the id "login-btn"
button = driver.find_element(By.ID, "login-btn")
button.click()// click on button with the id "login-btn"
let button = await driver.findElement(By.id('login-btn'));
await button.click();To explain how the code above works:
First, you need to find the element using the driver.findElement command, and pass in a Locator, such as By.id("login-btn"). This will instruct Selenium to find an element with the id attribute set to "login-btn". The result is an ElementReference, which we assign to the variable named button for the next step.
Then, we can use the .click command to instruct Selenium to perform a click on the button using the left mouse button.
Ways to target a button
Locators are a way to identify an element on a web page, and it is passed as an argument to the findElement method. There are many ways to target an element to click using Selenium, using different locator strategies:
- By Element ID, with
By.id - By class name, with
By.className - By text, with
By.linkText(for link elements only) - By CSS, with
By.cssSelector - By XPATH, with
xpath
Find a button by ID
If the ID is set for a button, you can use By.id to find the element. Here's an example:
// click on button with the id "login-btn"
WebElement button = driver.findElement(By.id("login-btn"));
button.click();# click on button with the id "login-btn"
button = driver.find_element(By.ID, "login-btn")
button.click()// click on button with the id "login-btn"
let button = await driver.findElement(By.id('login-btn'));
await button.click();Find by a button by class name
You can also find a button using one of its CSS classes, using By.className. Here's an example:
// click on button that has the class "add-to-cart-btn"
WebElement button = driver.findElement(By.className("add-to-cart-btn"));
button.click();# click on button that has the class "add-to-cart-btn"
button = driver.find_element(By.CLASS_NAME, "add-to-cart-btn")
button.click()// click on button that has the class "add-to-cart-btn"
let button = await driver.findElement(By.className('add-to-cart-btn'));
await button.click();Find a link by text
If the button we want to click is an <a> link styled as a button, you can find it by its text using By.linkText. Here's an example:
// click on link with the text "Login"
WebElement button = driver.findElement(By.linkText("Login"));
button.click();# click on link with the text "Login"
button = driver.find_element(By.LINK_TEXT, "Login")
button.click()// click on link with the text "Login"
let button = await driver.findElement(By.linkText("Login"));
await button.click();Find a button by CSS
You can also use CSS expressions, using By.cssSelector. Here's an example of how to find a button that has a data-test-id attribute set to "login-btn" using a CSS expression:
// click on button that has the "data-test-id" attribute set to "login-btn"
WebElement button = driver.findElement(
    By.cssSelector("button[data-test-id='login-btn']")
  );
button.click();# click on button that has the "data-test-id" attribute set to "login-btn"
button = driver.find_element(
By.CSS_SELECTOR("button[data-test-id='login-btn']")
)
button.click()// click on button that has the "data-test-id" attribute set to "login-btn"
let button = await driver.findElement(
By.css("button[data-test-id='login-btn']")
);
await button.click();Find a button by XPATH
XPATH is a powerful query language for navigating XML documents, include HTML web pages.
If you are familiar with using XPATH, you can use By.xpath to find a button. Here's an example of how to find a button that has a data-test-id attribute set to "login-btn" using xpath:
// click on button that has the "data-test-id" attribute set to "login-btn"
WebElement button = driver.findElement(
    By.xpath("//button[@data-test-id=login-btn]")
  );
button.click();# click on button that has the "data-test-id" attribute set to "login-btn"
button = driver.find_element(
By.XPATH("//button[@data-test-id=login-btn]")
)
button.click()// click on button that has the "data-test-id" attribute set to "login-btn"
let button = await driver.findElement(
By.xpath("//button[@data-test-id=login-btn]")
);
await button.click();Common Selenium errors and pitfalls
No such element error
A common error that people experience is when the findElement command throws the no such element error. This can happen if the locator is incorrect (or out of date if the script was working before), but also because the element is or within a dynamic component and is not yet rendered on the page.
To make your test more stable, you can add Explicit Waits to ensure that the element is visible before clicking. Here's an example:
// create a wait with a threshold of 10 seconds
Wait<WebDriver> wait = new WebDriverWait(driver, Duration.ofSeconds(10));

// find the element and wait for it be displayed
WebElement button = driver.findElement(By.id("login-btn"));
wait.until(d -> button.isDisplayed());

// then perform the click
button.click();# create a wait with a threshold of 10 seconds
wait = WebDriverWait(driver, timeout=10)
# find the element and wait for it be displayed
button = driver.find_element(By.ID, "login-btn")
wait.until(lambda _ : button.is_displayed())
# then perform the click
button.click()// find the element by id
let button = await driver.findElement(By.id("login-btn"));
// wait for up to 10 seconds for the element to be displayed
driver.wait(until.elementIsVisible(revealed), 10000);
// then perform the click
wait button.click();Element not interactable
Sometimes the click command fails because the element is not interactable. This error can happen when the button is not scrolled into view, or if it is obscured by another element (such as a sticker header), or if the button is disabled.
If the button is not scrolled into view, you can send a Javascript command to the browser to scroll the button into view.
JavascriptExecutor js = (JavascriptExecutor) driver;
js.executeScript("arguments[0].scrollIntoView(true);", button)driver.execute_script("arguments[0].scrollIntoView(true);", button)await driver.executeScript("arguments[0].scrollIntoView(true);", button)Best practices for stable locators
People often complain about flaky tests — and the biggest cause of flaky tests is the use of unstable locators to find elements.
It is highly recommended for testers and front-end developers to work together to define a setting convention in setting element locators for automated testing. A common convention is to set a unique data-test-id attributes on elements, instead of using the element’s ID or class names which are frequently modified by frontend developers for binding javascript events and styling. That way, frontend developers will be mindful not to unintentionally remove or rename the data-test-id attributes referenced by the Selenium test scripts and accidentally breaking the tests.
Write stable tests using UI-licious
If you're tired of maintaining brittle tests and fixing broken locators, UI-licious makes things easier.
The UI-licious Test Framework offers a robust way to target elements using human-facing labels.
Our philosophy is Test User Journeys, not HTML.
With UI-licious, you target elements by the labels your users actually see — like “Login” or “Checkout.” These labels are far more stable than element IDs, classes and attributes, which are mainly used by frontend developers for styling and logic.
The UI-licious Test Framework works by analysing the DOM tree of the webpage during runtime to find the best match for the given label. A score is computed for all visible elements on the page, with higher weights when using the click command for:
- clickable elements such as links, buttons, and input elements
- elements that contain text that matches the label
- elements where the accessibility attributes (e.g.
aria-label) matches the label - elements where the tooltip, set using
titleattribute, matches the label - images where the
alt-textmatches the label - elements that are near text that matches the label
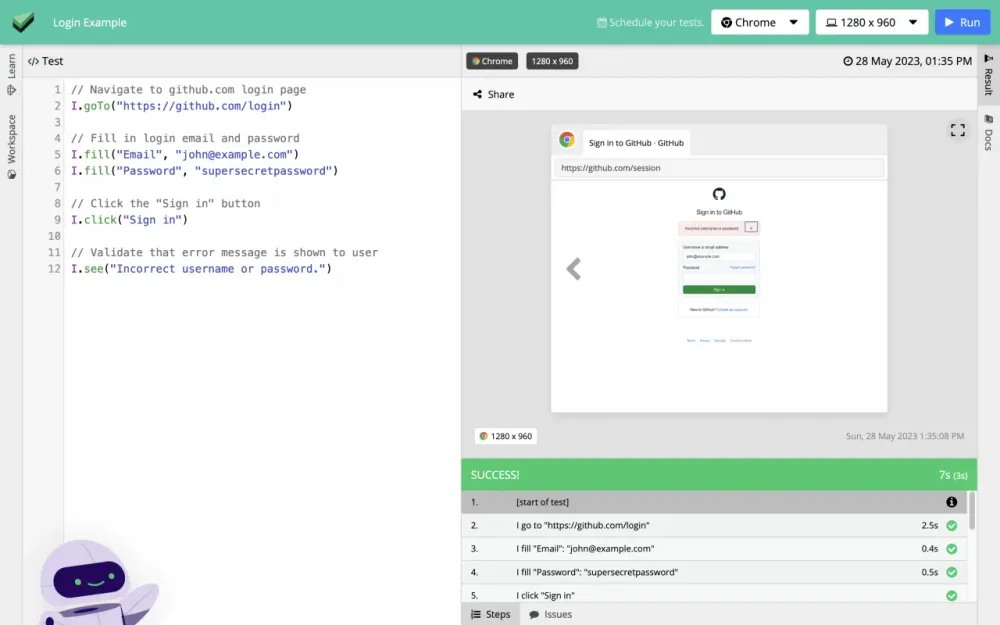
Here's an example of how to click a button using UI-licious, with human-facing labels:
// Navigate to github.com login page
I.goTo("https://github.com/login")

// Fill in login email and password
I.fill("Email", "[email protected]")
I.fill("Password", "supersecretpassword")

// Click the "Sign in" button by text
I.click("Sign in")

// Validate that error message is shown to user
I.see("Incorrect username or password.")
UI-licious allows you to use CSS and XPATH expressions when necessary. It's as simple as I.click(".login-btn") or I.click("//button[@data-test-id='login-btn']") to click a button using CSS or XPATH respectively.
And you don't need to sprinkle explicit waits everywhere, because UI-licious automatically waits for elements to be visible before attempting to click (for a default threshold of 15 generous seconds).
UI-licious also takes screenshots are for every step, allowing you to see exactly what the user sees.
Here's the result of running the test using UI-licious:
Try UI-licious for free today using Snippets, an interactive playground for writing and running public tests — no sign up required.