
Testing Login and Sign Up forms containing sensitive information can be tricky. Especially when needing to share the testing results with someone outside of the project such as a client or customer. The same goes with testing different testing environments such as UAT and Production.
It can feel cumbersome having to constantly switch between environments. Luckily, within UIlicious there is a feature called Datasets that helps users mask their sensitive information such as Username, Email, and Passwords. Switching between environments is also easy since users can set their environment by simply entering the URL.
Storing sensitive data such as usernames and passwords is essential when performing Data-Driven testing. This enables testers with the option to input a single test script for executing automated tests containing the data stored within the Dataset. By utilizing this feature in UIlicious, the benefit outweighs the cost since this is not only free to use but an extra layer of security is added. Plus, because Datasets are easy to set up and use, time is saved.
Table of Contents:
Setting up a Dataset is quite easy and involves only three steps
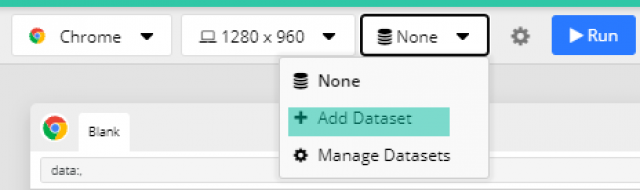
The first step is clicking on the Dataset dropdown and selecting + Add Dataset:
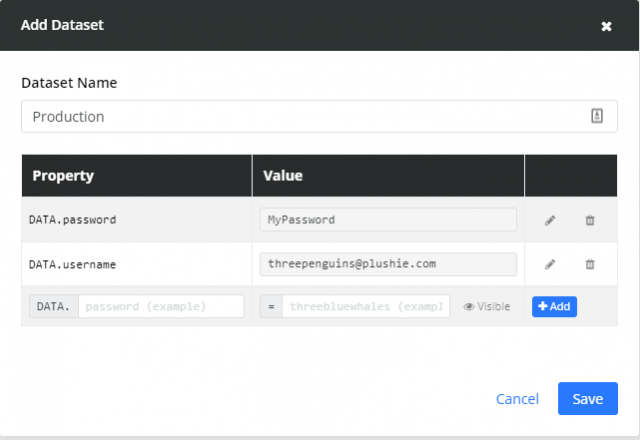
This will bring up the Add Dataset modal window, which is where all the configuration takes place. Here you can enter your Dataset Name which can be your environments such as Production or Staging.
Inside the modal, there are two columns, Property, and Value. The Property value is where you enter the name of the field you wish to use such as Password or Username. In the Value column, this is where the specific information is entered such as the password, email address, and username.
After entering the required information within the Property and Value fields, there is a Visible field beside the Add button. Clicking on this will cause the information entered into the Value field to become hidden from any users who view the test results.
With the necessary information in the fields set, simply click on the Save button to proceed to the next step.
Here is an example of what the fields will look like when setting up a Dataset for testing a login in a Production environment.
Sign up for UI-licious now
The second step involves adding the Property and Value fields into your test script
This is actually quite simple since all you need to do is use the text within the Property fields in your I.fill script.
Without using a Dataset the test script will look something like this:
I.goTo("https://github.com/login")
I.fill("Username", "[email protected]")
I.fill("Password", "MyPassword")
I.click("Sign in")
I.see("Incorrect username or password.")
With this script, the I.fill for both email and password shows the specific details of the email and passwords. However, when using a Dataset, the values are replaced with DATA.Username and DATA.Password.
Please note that the text entered in the Property field within the Dataset modal window is case-sensitive. So if you entered Data.password, this would be the same in your test script.
I.goTo("https://github.com/login")
I.fill("Username", DATA.username)
I.fill("Password", DATA.password)
I.click("Sign in")
I.see("Incorrect username or password.")
This is an example of how a test script containing the Dataset values.
With the script ready let's conquer the final step
Simply select the Dataset from the dropdown and click on the Run button and watch the magic happen. You will notice in the Testing Results will show the words “[truncated]” for any Values that were marked as Invisible during the Dataset setup, which I highlighted in this example:
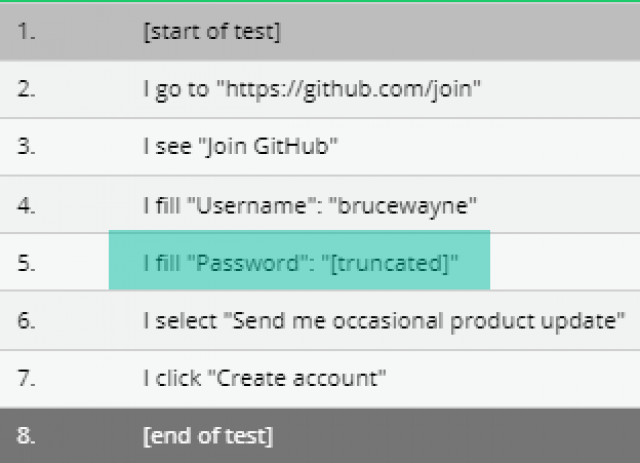
Now, if you need to share these results with anyone, they will not be able to see the sensitive information!
Happy Testing! 🙂
Photo by Jan Antonin Kolar