
In Selenium, if the elements are not found by the general locators like id, class, name, etc. then XPath is used to find an element on the web page.
An XML path is utilized to navigate across the page's HTML structure. For this purpose, it uses XML path expressions
Today, we will learn about XPath and how to use it in Selenium. We shall go through the concepts, locators, types, and axes of XPath.
Table of Contents:
What is XPath in Selenium?
Text boxes, dropdowns, buttons, tables, grids, auto-suggests, and other UI features can be selected using XPath (XML Path Language) in Selenium. If you want to perform some operation on a particular UI element with this popular testing framework, then XPath is usually the way to go. For example, you want to click a particular table column or row or cell of a table, etc... in such cases, you should use XPath as it will give better results as compared to CSS Selectors.
A more flexible option to Selenium
Providing correct XPath selectors for UI elements can be challenging because nowadays developers are constantly changing the code. For this reason, using XPath in automated tests can get complex and is often not maintainable. If anything changes from the root of the HTML document to the element, it will not work. While we strongly discourage it, if you absolutely must, you can use XPath selectors to target an element.
Therefore, you can avoid using XPath with UIlicious since our tool is able to retrieve labels and text directly from the rendered page.
UIlicious makes it easy to test and monitor user journeys on anything that runs in a web browser. This intuitive tool allows you to effortlessly create and maintain tests, so you have more time to focus on your product. With continuous monitoring, you can stay on top of defects and ensure your users always have the best experience possible. Additionally, using exhaustive bug reports and service integrations, UIlicious helps improve communication between team members.
You can try UIlicious for free. Register now!
You should also like: Read our in-depth comparison between Selenium, UIlicious, and other automation testing tools.
Sign up for UI-licious now
XPath types in Selenium
There are two types of XPath that you can use.
Absolute XPath
Relative XPath
If you are using Selenium IDE, then it has inbuilt support for absolute XPath only. This is because the selenium IDE is basically used to record and replay tests where the path of elements already mentioned by its ID or name attribute value. So, the test author need not bother about the location of the element in the DOM tree. However, when you are using Selenium WebDriver or RC (Remote Control), then you can use both types of XPaths.
Now, let's talk more in detail of these two types of XPaths in Selenium WebDriver.
Absolute path
An absolute Path is a direct way to find the element. It is the most straightforward technique to find the element, however, the downside of an absolute path is that if the element's path changes, the path will fail.
You can use absolute XPath when you want the exact location of the element (i.e. Location of the element in the DOM tree) to perform some operation on it. For example, you can use this method when some UI elements like table columns and rows do not have unique names or IDs. They are present in the DOM tree at a particular location and their name or id is relative to their location.
The key characteristic of an absolute XPath is that it starts with a single forward-slash(/), indicating that the element can be selected from the root node.
Example: On the Google account creation page, you can select the "First Name" field using the following absolute path:
/html[1]/body[1]/div[1]/div[1]/div[2]/div[1]/div[2]/div[1]/div[1]/div[2]/div[1]/div[1]/div[1]/form[1]/span[1]/section[1]/div[1]/div[1]/div[1]/div[1]/div[1]/div[1]/div[1]/div[1]/div[1]/input[1]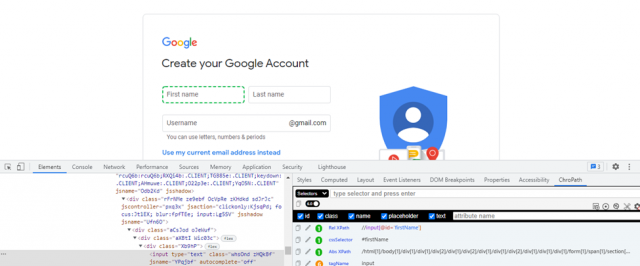
Relative path
If you are using Java with Selenium WebDriver, then the path of an element is relative to the current location of your code. In other words, relative XPath begins from the middle of the HTML DOM structure.
It starts with a double forward-slash (//).
It can search for items anywhere on the page, eliminating the requirement for a long path and allowing you to start from the middle of the HTML DOM structure. Because it is not a complete path from the root element, a relative path is always preferred over an absolute path.
Example: Let's take the same field on the same page as the previous example. One of its relative paths could be:
//input[@id='firstName']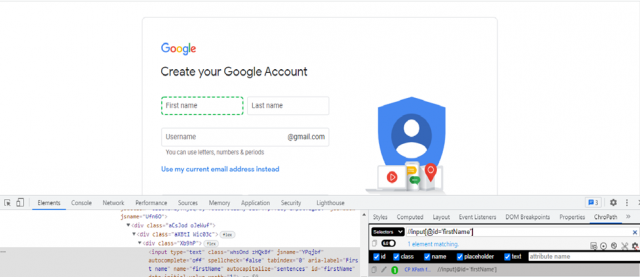
XPath locators: How to find elements by XPath in Selenium?
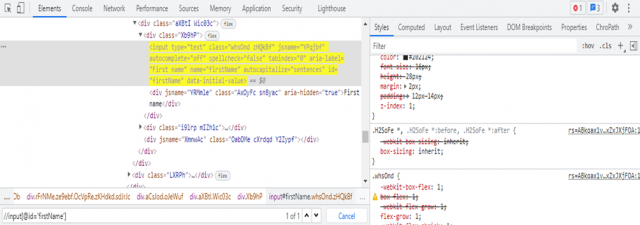
We'll use the Gmail registration page as our example. Let's say we want to find an element on this website with XPath: In order for that, all you need are some basic understanding about Selenium and its functions along with how it works in different browsers such as Chrome or Firefox among other things but first let me show what I mean by "find". When on a web page in your web browser, move your cursor to the First name field;
Now right-click on it and choose “Inspect”;
On inspect element, you will see an input tag and other attributes like class and id. We will talk more about them, hereafter.
To find the element on web pages accurately, there are a number of locator types. Here are a few XPath locator examples:
XPath Locators | Find different elements on a web page |
|---|---|
ID | Find the element by its ID. |
Classname | Find the element by its class name. |
Name | Find the element by its name. |
Link Text | Find the element by the text of the link. |
XPath | XPath is required for finding the dynamic element and traversing between various elements of the web page. |
CSS XPath | CSS path also locates elements having no name, class, or ID. |
XPath functions
Basic XPath
XPath expression select nodes or a list of nodes on the basis of attributes like ID, Name, Classname, etc. from the XML document as illustrated below.
Here are some examples of Basic XPath:
//button[@id='btnSavFuture']
//input[@id='date_input']
//button[contains(.,'OK')]
//select[@id='source']
/input[@id='date_input']
//select[@id='futureContractMonth']
//select[contains(@id,'cropId')]
OR and AND
In an OR expression, two conditions are utilized to determine if the first condition or the second condition is true. It also applies if one or both of the conditions are true. To find the element, any one of the conditions must be true.
In the case of AND, both the conditions should be true.
Example of XPath OR expression:
//*[@id='firstName' or @name='firstName']
Example of XPath AND expression:
//input[@name="email" and contains(@placeholder,'Email')]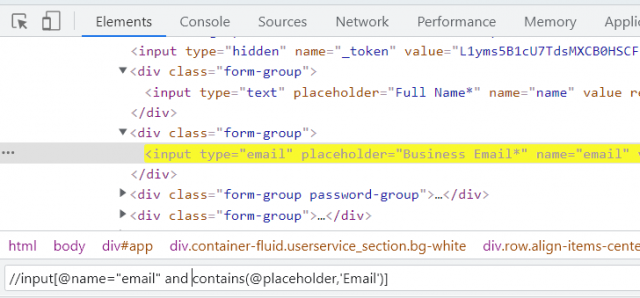
Contains
In an XPath expression, the technique Contains() is utilized when the value of an attribute varies over time, as when a user's sign-up information changes.
In the example below we have a button called Back. So to click on that button we have used the Contains() function in a way where it finds all the text labels including the word “Back”. In our case, we have only one occurrence of this word on the page so we got only one matching element.
//button[contains(.,'Back')]StartsWith
The starts-with function locates the element whose attribute value changes when the page is refreshed or when any other action is performed on it. To discover the element whose attribute changes dynamically, match the starting text of the attribute in this phrase. You can also look for an element with a static attribute value.
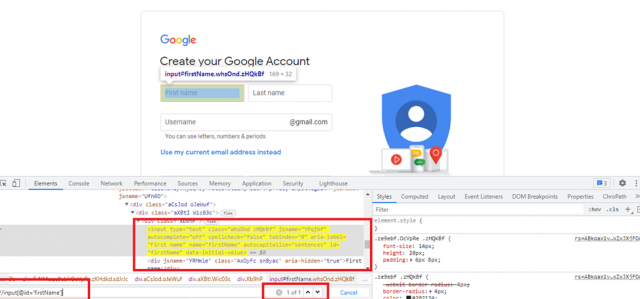
Example: In this example we have 5 input fields having a common class and the name of the class is “whsOnd zHQkBf”. We shall use the below XPath expression to fetch individual textboxes/fields.
//input[starts-with(@class, ‘whsOnd’)]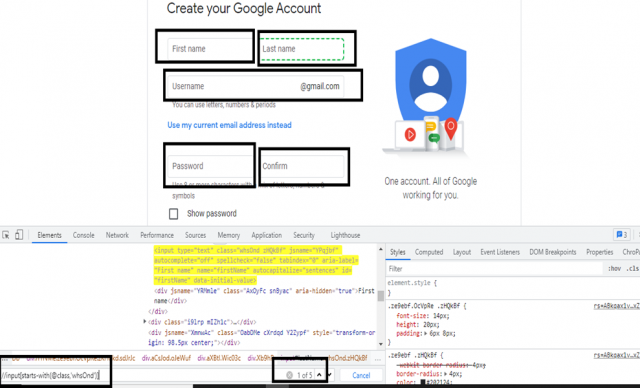
Text()
When we have a text defined in an HTML tag and want to identify that element through text, we use the text() method in XPath. When the other attribute values vary dynamically and no significant attribute value is used via Starts-with or Contains, this comes in useful.
In this expression, we use the absolute text that is present between the start tag <h1> and the end tag </h1>. If we use text() function with partial XPath as we do in contains() and starts-with(), we wouldn’t be able to find the element.
//h1[text()=’Log in to Twitter’]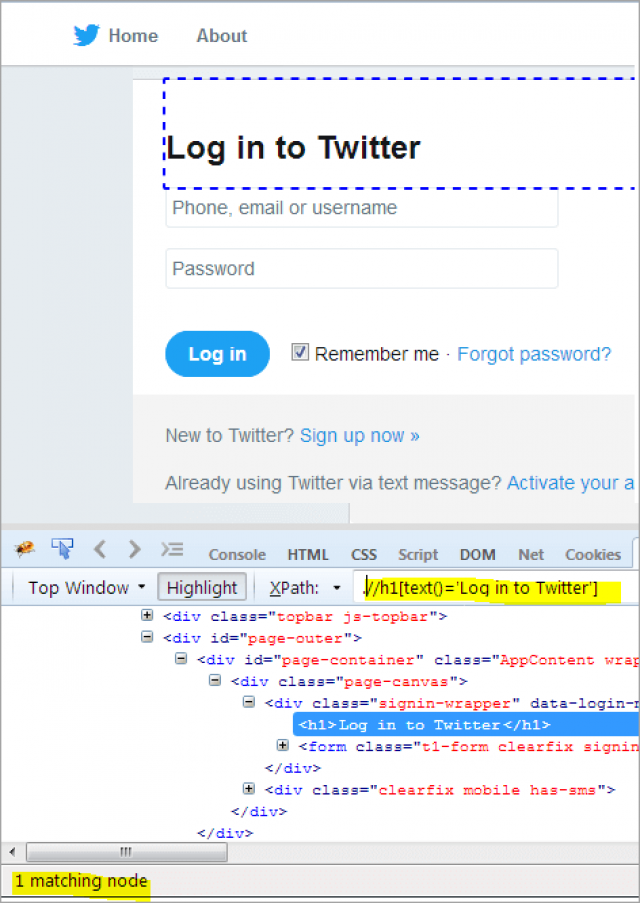
When we use an XPath expression to fetch a particular element sometimes we may get multiple matching nodes. “Index” is used when you want to fetch a particular locator among all these results. For this, you will have to specify the index value of the element you are targeting.
Template: XPath=(//*[@attribute='value'])[index]
Example: The following expression gets five matching elements on the Google registration page:
(//input[@class='whsOnd zHQkBf'])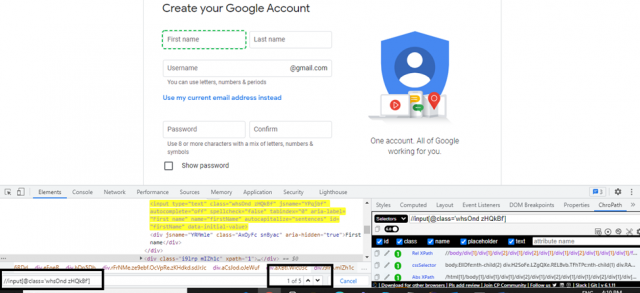
If you want to fetch only the first name field, you should write the following in your script:
(//input[@class='whsOnd zHQkBf'])[1]However, if you want to target the next field, i.e. "Last Name", change the index value as follows:
(//input[@class='whsOnd zHQkBf'])[2]Chained
The Chained XPath is nothing but the combination of XPaths merged in a chain. It is used when we have numerous similar items and looking for the exact index value will be challenging or time-consuming. With a Chained XPath, we can combine several criteria that will narrow down the number of items covered by your expression.
To determine an element position, we can use the "//" double slash to chain numerous relative XPath declarations.
Below XPath should help to locate 'Mac' and 'iPad' with chained XPath created using <ul> and <li> HTML tags given in DOM structure:
To locate 'Mac':
//ul[@class=’ac-gn-list’]//li[@class=’ac-gn-item ac-gn-item-menu ac-gn-mac’]To locate 'iPad':
//ul[@class=’ac-gn-list’]//li[@class=’ac-gn-item ac-gn-item-menu ac-gn-ipad’]XPath axes
The complicated or dynamic items are found using these XPath axes methods. We'll look at a few of these techniques below.
Ancestor
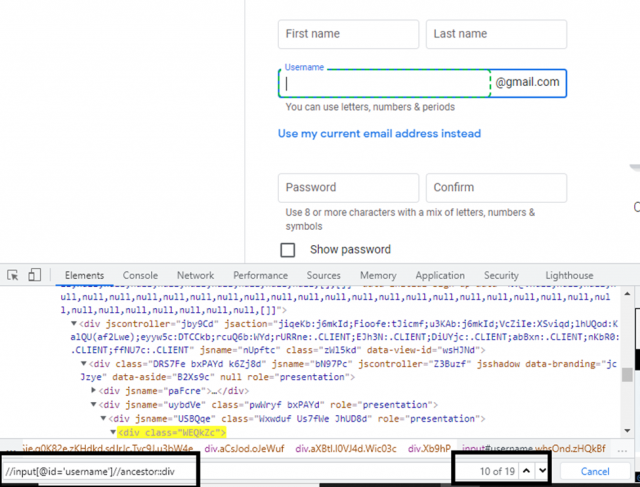
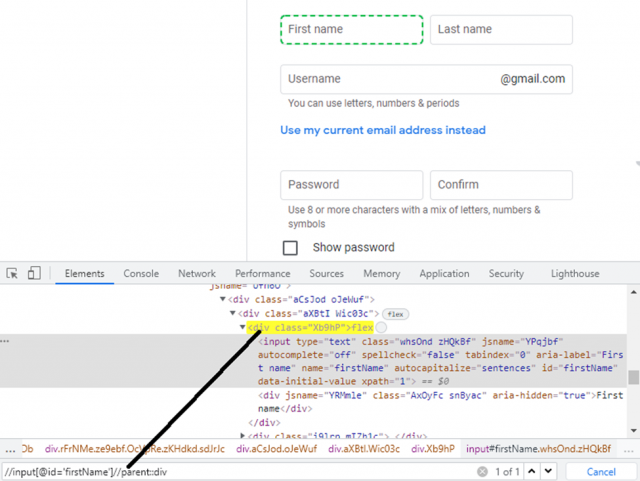
The ancestor XPath axe is a tool used for locating ancestors in an XML document. It can be used to find the parent, grandparent, and great-grandparent nodes of a given node. In the example, below XPath returns the parent node of the First name field.
Example: //input[@id=’username’]//ancestor::div
Following
Selects all elements in the current node's document.
Child
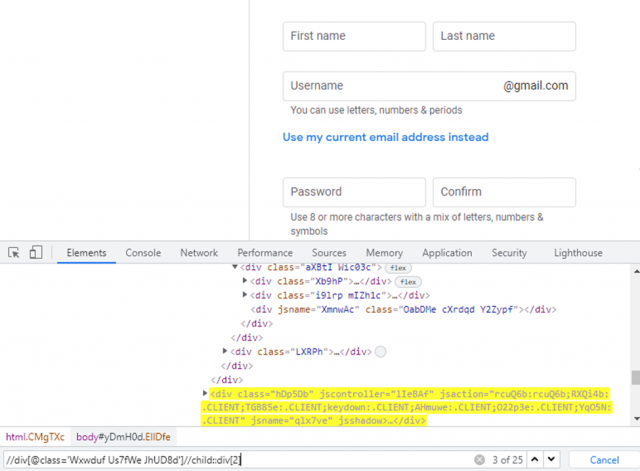
As the name suggests this axis allows finding all child elements of the current node. In the below case the application displays all the child nodes of a particular class. It’s more or less like a Descendant function, as we will see later in this section.
Example: //div[@class=”Wxwduf Us7fWe JhUD8d’]//child::div[2]
Preceding
The preceding XPath axe selects nodes that are preceding the context node. It is used to select the first node in a document or the first node after a certain point in the document.
Example: //td[text()='Cash']//preceding-sibling::td[1]
The XPATH expression above will select the preceding cell of a table cell with the text “Cash”.
Following-sibling
This function selects the following siblings of the context node. Siblings are at the same level as the current node.
//input[@id = 'u_0_5']//following-sibling::label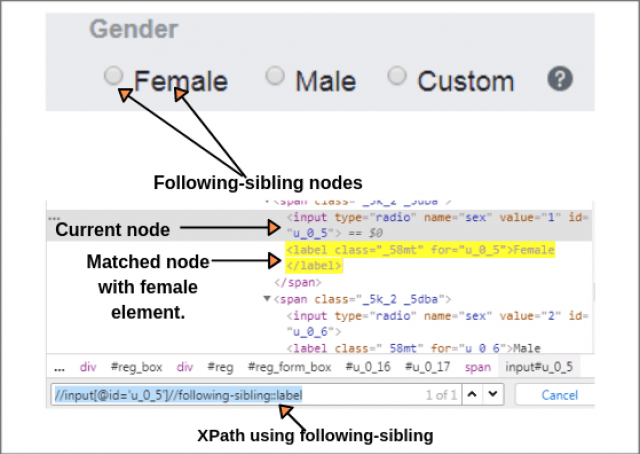
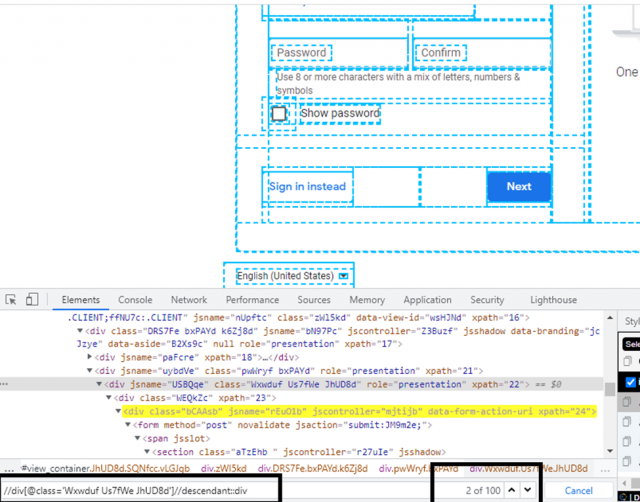
Descendant
The descendant XPath axe lets you select all the descendants of a particular element. This can be useful when you want to get all the child elements of an element, or when you want to get all the elements after a certain point in the document.
Example:
Parent
The parent XPath axe is a tool used for finding the parent node of an XML document. It is a fast and easy way to find the parent node without having to search through the entire document. The parent XPath axe is also great for finding the grandparent node, as well as any other ancestor nodes.
Example:
Self
Selects the current node or ‘self’ means it indicates the node itself.
Example:
//input[@id='email']//self::input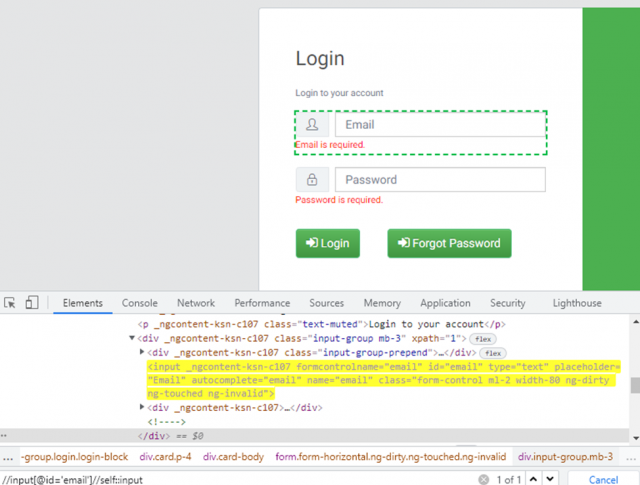
Descendant-or-Self
The descendant-or-self axis selects all the nodes in the document that are descendants of the context node, including the context node itself.
Sign up for UI-licious now
Final thoughts
XPath is essential in most automation testing tools to find elements on web pages so that automation scripts can produce UI interactions such as clicks, selects, or types. But, as we have just seen, this method can be complex to set up and difficult to maintain over the long term.
UIlicious is here to help you with your testing and consider stopping depending on an outdated method like XPath as UIlicious is able to retrieve labels and text directly from the rendered page.
UIlicious is the best way to automate your website tests. It makes it easy, fast, and simple! Try UI licious free by signing up today!